Image Map
Showing posts with label crafting. Show all posts

Breakfast Tray with Copper Piping for Home Depot


Home Depot style challenge piping

A few weeks ago, Home Depot asked me to participate in another fun DIY challenge. The challenge was to build something out of piping. I was a little hesitant to accept because I had never really worked with this material or a pipe cutter. 

Home Depot Style Challenge

I chose to to make upcycle this simple tray into a beautiful breakfast-in-bed tray with copper legs. Seeing that baby boy #3 is due any day and Mother's Day is right around the corner, I thought I might drop some subtle hints with this tray.

Copper craft wire


copper leafing on modern tray

I added some feminine touches to the tray with thin crafting wire on the handles and copper leafing on the legs. I think it softens it a bit, don't you?


For the full step by step on this Home Depot Style Challenge and more lovely images, hop over to the Home Depot apron blog and grab my directions. Feel free to get in touch if you have any questions!

pink and white tulips opening

*styling and photos by Amy Mikkelsen for YSP

Easter Candy Terrarium


Yesterday I spent a good bit of time putting together these Easter candy terrariums which I absolutely adore!  I've seen a few of them floating around on Pinterest lately but I first saw them last Easter when my aunt made them for the boys.  I just fell head over heels for them and knew I wanted to try this project for myself this year.   To add some special touches, I hand stenciled the bottom of the jars and topped them with a monogrammed carrot and green polka dot ribbon.

To complete this project, I used Martha Stewart Adhesive Stencils and Martha Stewart Paints and simply hand cut the carrot tags. Also, one other key thing to mention is that I opted for Smooth Ball mason jars (quart size) for aesthetic and photography purposes.  Most craft stores should carry them but they are much cheaper online by the case.  For the candy I chose a simple chocolate bunny that fit the width and height of the jar as well as mint mint M & M's and orange jelly beans. A few simple strands of Easter grass and a green ribbon complete the project.  Once the kids (and myself) consume the goods, I'll most likely re-purpose these painted jars into flower vases or Easter decor for next year. Wouldn't they look precious with some daffodils or white tulips? 


Preserving Fall Leaves


Do you remember as a kid preserving leaves in between the pages of your encyclopedias?  My sisters and I would stick all kinds of things in those pages only to discover them months or years later!

Well now that I'm older, I'm not quite that patient.  I want that instant gratification when it comes to my crafting projects so I was quite happy when I discovered this method for preserving fall leaves. Last week, while the kids and I played outside, I gathered these gorgeous leaves from the yard to use on my Thanksgiving table.  I love using plants, flowers and just about anything I can gather from my yard because it's free of charge and nothing captures the beauty of the season like mother nature.

To preserve these leaves, I used the following steps:

1.  Gather some pretty leaves that have just fallen.  Make sure they are still soft and supple.  Avoid leaves that are already dry.

2.  Lay about 5 leaves flat, in between two paper towels.  Place them on a microwave safe dish and set them inside the microwave.

3.  Microwave the leaves at 30 second intervals until they begin to dry out. You will feel the paper towels begin to absorb the moisture from the leaves.

CAUTION: Leaves can catch fire in the microwave so please keep a close eye on this project and only heat in intervals.  Do not allow the leaves to become scorched or crisp.

4.  Once the leaves have dried, spray them with an acrylic spray on both sides and allow to dry.

These leaves will maintain their color but will still be quite fragile. I plan to use them scattered on the table or possibly as name place cards.  

Hope y'all had a lovely weekend!

Children's Calendar


School is completely in full swing and I'm ashamed to admit that my son and I worked on this calendar back in August and I finally got it hung in his bedroom.  (My apologies for the weird lighting in these photos as the light in his room is totally whack.)  Anyhow, I was inspired by another homeschooling, blogging mom at Counting Coconuts and in some random fit of summer boredom and August heat, this calendar was born.  I used a lot of scrapbook materials just lying around the house and my son enjoyed helping with stickers and gluing. 


I wanted to get him acclimated with days of the week, months, seasons, counting, sequencing, weather, astronomy and some personal things like gratitude, manners and love.


I picked up these numbered calendar cards at The School Box store and attached them with Velcro so they can be adjusted each month.


I made the weather cards and put them on a metal ring.  My son loves this part of the calendar everyday!


I also ordered these phases of moon via Montessori, another highlight for Luke!


I also made the seasons cards and let Luke decorate with stickers to his hearts desire.


This was a pretty big project that took some time but I think it's something he can use for quite some time.  It's been especially helpful lately, now that we're counting down to birthdays and holidays like Halloween!  I do recommend laminating most all of the "pieces" as they are handled a lot by little hands that are curious and enjoy playing.

Happy Tuesday y'all!

Sweet Treats

You know what my favorite part of Valentine's Day is?  The homemade part.  I'm by no means the craftiest of people.  I don't sew, or knit or bake particularly well but I love to be in the kitchen and so does my oldest son.  He calls it "playing cooking show."  

These "chocolate dippers" were the perfect treats for him to help me with.  His favorite part?  Mixing in the food coloring.  We simply melted some Baker's white chocolate, dyed to our favorite shade of pink and began dipping! 

The sweet and salty mix of the peanut butter and white chocolate is yummy!


You can't go wrong with chocolate covered pretzels.  And well, store bought marshmallows aren't my favorite indulgence but kids love 'em and they look cute.


We also "upcycled" some baby food containers by filling them with classic conversation hearts and securing it with kitchen twine.  We made several of these sweet surprises to give to friends.


I'm gonna try to figure out how to have an entire conversation with my husband via candy hearts this weekend.  Well, maybe not but doesn't it sound kinda fun?

xoxo

Creative Gift Adornment


A few days ago, I stumbled upon these colorful wall decals by Lot 26 Studio.  While they're not really my taste for wall decor, I found them to be perfect little adornments for gifts and cards!  I also added a pom pom in the middle of each flower for extra color.  I bought two (20 count) packs on sale for $2.50 each, which was a steal compared to their retail price of $25.00!

I love giving things new life and for that price, I couldn't resist.


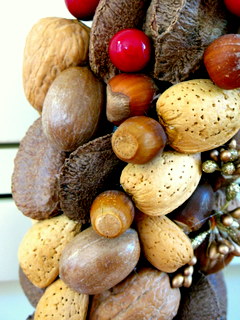
Nut Wreath


This is the time of year I get inspired to challenge my crafting skills. I do it simply because I enjoy it!  Since I've been a little girl, I've always enjoyed "making things" and that hasn't changed a bit now that I'm an adult.When I'm creating, I'm relaxing.  But with two little guys running circles around me, I have minimal time to indulge the left side of my brain.  I really have to pick and choose my projects.  

There are so many beautiful creations out there in blogland.  Most of them I look at and say to myself, "Isn't that cute?" and then there are those that I say to myself, "I must do that! !"   So, here is my spin on this gorgeous creation made with nuts, berries and pine cones.  I absolutely adore the organic, natural look of this wreath and it can be used throughout both fall and winter.  It took me about an hour to complete this project and piecing the nuts together was similar to putting together a jigsaw puzzle.  It was actually quite fun!  All you need is a Styrofoam form, glue gun, ribbon, nuts and and any other trimmings that suit your fancy!

I found this bag of mixed nuts at my local Publix.  One wreath required one and a half 16 oz. bags.


  Start with placing the ribbon around the wreath.  Secure with hot glue.

Secure pine cones, faux berries, nuts and any other trimmings with hot glue!

I gathered some (free!) acorns (again) from my neighbors driveway to fill in any gaps.  I love my neighbors.

Voila!  A beautiful nut wreath complete with "pine cone bow!"  If you have any questions on how to make your own, I'd be more than happy to answer them!

Next on my list is a kissing ball because everyone needs extra kisses during the holidays, right?